Ultimate Guide to Organizing, Packing, and Moving Your Kitchen
How to Book a Mover

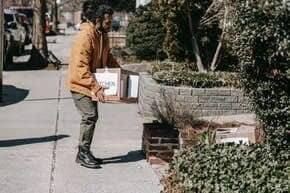
No one enjoys packing all their goods into boxes and moving them from one home to another. But a little preparation can help you stay on track during this tough time.
How to Organize Your Move
Electronics are some of our most high-priced items. It requires simple care to protect them from damage during transportation. Follow the steps in the article to prepare your electronics for a move.
How to Pack Electronics for a Move
If you're thinking about moving a piano, the question that comes up is "how do I do that". Since pianos are large and heavy, hiring professional piano movers is strongly recommended. But if you still want to do it yourself, follow the steps below.
How to Move a Piano
The most common time of year to move is undoubtedly the summer. Moving during the summer does have its disadvantages, though. For example, the strong heat may hinder your move, and movers may charge extra because of the high service demand.
Tips For Summer Moves
Your wine and liquor are more than just bottles; they're investments. Our in-depth guide teaches you how to safeguard them during a move. Get step-by-step instructions on packing, storing, and even insuring your collection for a worry-free relocation.
Packing Wine & Liquor for Your Next Move
Unpacking is just the beginning! Our comprehensive guide offers actionable tips on setting up utilities, organizing spaces, and even throwing a memorable housewarming party. Make your transition smooth and stress-free.
Your Essential Post-Move Checklist
Need to relocate ASAP? Our guide is your go-to resource for a successful, last-minute move. Discover tips on quick decluttering, securing reliable movers on short notice, and ensuring a smooth transition to your new home.
Expert Tips for a Last-Minute Move
Moving can be stressful, but your home's surfaces don’t have to take the damage. Read our guide on how to protect your carpets, floors, and walls during a move. Keep your home clean and damage-free while you move.
A Guide to Carpet, Floor, and Wall Protection
Are you a student gearing up for a move? Don't break the bank! Our guide offers savvy tips to help you save money while transitioning. From DIY packing to budget-friendly movers, we've got you covered.
Smart Student's Playbook for an Affordable Move
Don't let common mistakes derail your big move. Our comprehensive guide walks you through the dos and don'ts, ensuring you save time, money, and sanity. Get the lowdown on what not to do
How to Dodge Common Moving Mistakes
Stress-Free Kitchen Move: Organize, Pack, and Settle In
Relocating can be stressful both emotionally and logistically, and the kitchen adds to the challenge. Your kitchen is more than a place for cookware. It’s the heart of your home where you prepare meals and make memories.
The hardest part of moving a kitchen is dealing with its many details, like fragile glassware, heavy appliances, and small, often irreplaceable items. It’s more than just packing. It’s about preserving your daily routine.
What can you expect from this guide? This guide helps you move through the challenges of organizing your kitchen. It helps you sort your belongings and finish your setup in the new kitchen. You'll find helpful packing and moving tips based on expert experience. This guide also recognizes how personal your kitchen can be. By the end, you won’t just have moved your kitchen. You’ll be more prepared to handle other major life changes.
What Makes Moving a Kitchen Different
You may consider packing up a bedroom or living room a daunting task, but the kitchen is in a league of its own. Far more than just another space, it's a sophisticated blend of culinary instruments, treasured keepsakes, and state-of-the-art appliances. Unlike the uniform contents of a bookshelf or closet, the kitchen is home to various items, each demanding its own packing strategy. Think about the delicacy of wine glasses, the unconventional contours of pots and pans, and essential gadgets like your coffee maker or microwave. Each item plays a critical role in your daily routine, and one misplaced piece can throw your whole day off balance.
But more is happening here than just dealing with physical items. The kitchen is the emotional center of your home, where food and memories come together. It’s where you’ve blown out birthday candles, made holiday meals, and shared deep conversations over a warm drink.
These emotional ties make the move more complicated. You’re not just moving items. You’re carrying a way of life, your personal history, and part of who you are. That’s why it’s so important to take a careful approach. You’re not just packing boxes. You’re protecting memories and keeping your daily life intact. Moving is a big task, but it’s worth it. A well-packed kitchen helps your new place feel like home right away.
Kitchen Packing Isn’t as Simple as It Looks
The initial phase of this complex undertaking involves sorting your kitchen items into categories. Fragile treasures like your heirloom china or anniversary wine glasses demand careful packing, cushioned with bubble wrap and placed in clearly marked boxes. These aren't just dishware; they're memories crystallized in fragile materials. Ensuring a smooth transition to your new home is a valuable payoff, especially when the stakes are high.
One common myth is that taping drawers or containers shut will keep everything secure. This rarely holds up during transport. Instead, take everything out of drawers and pack those items separately, especially if they’re sharp or heavy. Don’t assume your moving company will pad everything. Unless you’ve paid for professional packing, you’re responsible for wrapping breakable items. Trusting duct tape to seal a drawer is a common mistake that often causes cracked frames or jammed compartments during a move.
Next, let's tackle the large items: your fridge, oven, and that indispensable high-end mixer. These kitchen mainstays require a unique approach due to their size. Measuring doorways and crafting a detailed logistical plan is essential. And let's not overlook the basics, the must-haves like your coffee maker and a go-to dish set, which should be packed last and accessed first upon arrival. According to research from the National Association of Realtors, setting up the kitchen as a priority considerably eases the moving stress, allowing your first morning in the new space to feel welcoming.
Navigating the complexities of a kitchen move is a nuanced task. It goes beyond merely boxing up breakables; it's about preserving your lifestyle. You're not just transporting objects; you're choreographing an intricate dance of practicality and sentiment. As you make your way through this elaborate process, consider the complexity not as an obstacle, but as a gateway to a fresh chapter in your life.
Creating a Master Plan
What if moving your kitchen could be more than just a chore? What if it could actually feel rewarding? The key is careful planning. It's not just about avoiding broken dishes or misplaced utensils. It's about protecting the personal meaning your kitchen holds. A well-executed move can serve as a cleansing journey, offering you a chance to declutter your surroundings and clear your mind. Research from the American Psychological Association supports this, revealing that organized spaces can significantly lower stress levels. So when you map out your move, you're not just arranging a new culinary space; you're paving the way for a more balanced life.
The Timeline: When to Start Packing
Time is of the essence, particularly when managing a complex move like this one. The countdown begins as soon as you decide to change your address. Start by packing delicate valuables such as your china three weeks ahead, secured with bubble wrap and labeled clearly. Meanwhile, day-to-day necessities like your coffee maker should be among the last items to go into boxes. Research from the National Association of Realtors indicates that establishing your kitchen first in your new residence can markedly reduce the stress of moving. So, when is the best time to begin packing? The answer is immediate, but always with a focus on what's most important.
If you're short on time, start with one room at a time and use packing kits that are already labeled. Begin with low-use areas like the pantry, then move on to spaces you use every day. Pack similar items in the same box to save time and reduce extra trips. To move faster, set a timer for each task and ask others to help with repetitive jobs like wrapping utensils or labeling boxes. Even a 30-minute session with a checklist can make more progress than you might expect.
To help you stay on track, here’s a detailed kitchen packing timeline that shows what to pack and when. This helps you be ready and not rushed by moving day.
| Timeframe | Items to Pack | Tips |
|---|---|---|
| 3 Weeks Before Move | Rarely used items, heirloom dishes, decorative serveware | Use bubble wrap and double-box fragile items. Label clearly with destination cabinet. |
| 2 Weeks Before Move | Cookware, small appliances you don’t use daily | Nest pots and pans; insert towels between for cushioning. |
| 1 Week Before Move | Pantry (non-perishables), backup dishes, utensils | Avoid overfilling boxes; place canned goods at bottom for balance. |
| Day Before Move | Everyday dishes, coffee maker, snacks | Pack into a clearly marked “Essentials” box for immediate access. |
The Budget: Estimating Costs and Where to Save
Let's tackle the financial aspect in a straightforward manner. Relocating a kitchen comes with its share of costs, from packing supplies to hiring skilled professionals to handle your delicate items. The silver lining? You can cut costs without sacrificing quality. For example, use towels or clothing to protect fragile belongings rather than purchasing bubble wrap. Based on HomeAdvisor's data, an average local move can cost about $1,250, but with astute planning, you can reduce this by up to 20%. Remember that the objective isn't merely to move items but to transition smoothly and affordably to your new setting, all while keeping your valuables intact.
This isn't just about transporting your belongings; it's about ushering in a new chapter of your life with both efficiency and affordability. So as you find yourself in your kitchen amidst a collection of memories and daily essentials, rest assured that you're thoroughly prepared to make this move an unqualified triumph.
Inventory Checklist
Begin by sorting your kitchenware into three categories: 'Essentials,' 'Occasional Use,' and 'Rarely Used.' Your essentials are the must-haves, the things that make your kitchen uniquely yours. As for the 'Rarely Used' items, now is the moment to reassess their role in your life. Studies by the American Psychological Association reveal that decluttering can markedly reduce stress. So don't hold back. If that pasta maker has collected dust for years, perhaps it's time to part ways.
Time to get down to the details and evaluate your inventory. It's not just about the objects themselves, but the value they hold for you. Those vintage teacups aren't just porcelain; they're tangible pieces of your family history. Use a color-coding system to gauge the sentimental and practical worth of each piece. Go with green for 'Must-Keep,' yellow for 'Consider Donating,' and red for 'Time to Let Go.' Research from the American Moving and Storage Association shows that careful packing can reduce the likelihood of breakage by a whopping 75%. When wrapping green-sticker items, they deserve five-star treatment. Use bubble wrap, double box them, and make sure they are handled with care.
Organizing Your Kitchen
Beyond just essentials and non-essentials, some kitchen items carry sentimental value that can't be boxed. Create a 'Heartfelt' category for items like the mug from your first job or the cutting board from your grandma. These are items that, if lost, would feel like a piece of your history is missing. By identifying these emotionally-charged items, you're not just organizing; you're honoring your past. This nuanced approach ensures that you're emotionally connected to the process, making it less of a chore and more of a reflective journey.
Labeling System
After you've grouped your items into designated zones, label them in a way that makes sense to you. Move past the standard labels like 'Fragile' and 'Handle with Care.' Aim for specificity. Create labels that not only list the contents but also indicate their intended location in your new kitchen. For instance, a box filled with your daily-use dishes could be tagged "Everyday Dishes - Upper Left Cabinet in New Kitchen." While this level of detail may seem excessive now, you'll appreciate it when you're wading through a sea of boxes in your new home. According to a survey by the National Association of Professional Organizers, explicit labeling can trim down your unpacking time by as much as 30%.
Use this quick reference to apply a color-coded system when evaluating your kitchen items. It helps you declutter efficiently and pack only what truly matters.
| Color Label | Meaning | Action to Take | Example Items |
|---|---|---|---|
| Green | Must-Keep | Pack carefully using bubble wrap and double-boxing | Family heirloom china, everyday coffee mug, chef’s knife |
| Yellow | Consider Donating | Evaluate usefulness; donate if not frequently used | Extra baking pans, second blender, unused wine rack |
| Red | Time to Let Go | Recycle, toss, or responsibly dispose | Broken toaster, expired spices, cracked mugs |
Decluttering Before You Move
Before diving into the packing process, seize this golden chance to not just streamline your move but also set up a more efficient kitchen in your new home: it's time to declutter. This isn't just a spur-of-the-moment cleanup; it's a thoughtful exercise to align your possessions with your lifestyle and future plans. Research shows that tidying up your space can boost your mental well-being. Use this moment to examine not only what you own but also what genuinely serves your needs. Draft a 'Future Kitchen' list, spotlighting items that mesh with your culinary ambitions and daily living. Consider this list your blueprint for deciding what stays.
Donation and Disposal
After pinpointing what doesn't make the cut for your 'Future Kitchen,' the next move is to responsibly part with those items. Donating still-functional things is a dual benefit: you declutter while extending a helping hand. Reputable organizations such as Goodwill and Habitat for Humanity gladly accept such contributions. For items past their prime, consider specialized recycling options. Old kitchen appliances, for example, can be broken down for their components. This is your opportunity to make conscious decisions that echo the responsible citizen you aspire to be in your new home.
Gathering Packing Supplies and Boxes
Moving brings both emotional stress and practical challenges. To move your kitchen safely, the core of your home, you need the right supplies. The basics include durable moving boxes of various dimensions, paper or protective wrap for your delicate keepsakes, strong packing tape, and indelible markers for precise labeling. Each element is crucial for a seamless changeover. The bonus? Planning in advance and price comparison can help you keep costs in check. Smart preparation can cut your spending on packing materials by up to 25%. To pack your kitchen efficiently, consider using a mobile app that offers a virtual layout of your new kitchen, allowing you to pre-plan where each item will go.
Here’s a checklist of kitchen packing materials and recommended quantities to help you prepare without overpacking or spending too much.
| Supply Item | Recommended Quantity | Usage Notes |
|---|---|---|
| Small Moving Boxes (16"x12"x12") | 10–15 | Best for canned goods, small appliances, utensils |
| Medium Moving Boxes (18"x18"x16") | 10–20 | Use for pantry items, cookware, serving bowls |
| Dish Pack Boxes with Dividers | 4–6 | Essential for plates, glasses, china, fragile mugs |
| Bubble Wrap or Dish Towels | 50 ft roll or 15 towels | Wrap fragile items; substitute towels to cut costs |
| Packing Paper or Newspaper | 100 sheets | Pad box bottoms and fill empty gaps |
| Heavy-Duty Packing Tape | 3–4 rolls | Secure boxes and reinforce dish packs |
| Permanent Markers | 2–3 | Label boxes with contents and destination zone |
| Zip Bags (Gallon + Quart Sizes) | 1 box each | Store small parts, appliance accessories, loose items |
| Moving Blankets or Large Towels | 4–6 | Protect large appliances and reduce shock |
Where to Find Supplies: Tips and Ways to Save Money
Before rushing to a specialized store for moving supplies, explore more cost-effective and eco-friendly alternatives. Many local grocery or liquor stores will provide durable boxes for free if you inquire beforehand. Instead of buying bubble wrap, look to your linen closet. Towels, blankets, and even clothes can act as excellent padding materials, minimizing both costs and waste. According to an EPA study, repurposing household items as packing materials can notably reduce your carbon footprint. In this way, you're not just streamlining the setup of your new kitchen, but you're also making a mindful decision for the environment.
Plastic totes are water-resistant, reusable, and stronger than cardboard. This makes them a good choice for kitchen items that might leak or break. But they don’t stack as efficiently in a moving truck and cost $5 to $8 each to rent. Cardboard boxes are often available for free. Use totes for liquids, oils, and pantry items that might spill. Use cardboard boxes for dry goods and wrapped dishware.
Popular BPA-free plastics in kitchen containers can warp at temperatures above 120°F, a level often reached inside trucks. The FDA says these materials are food-safe but not heat-stable. Pack these items away from appliances that generate heat, and don’t place heavy boxes on top of them.
Safety First: Precautions and Regulations
Handling hazardous materials such as cleaning supplies and gas cylinders requires careful consideration. The U.S. Department of Transportation has strict regulations for the transport of these dangerous goods. For example, cleaning products containing bleach or ammonia must be securely sealed and stored in a dedicated box marked "Hazardous." As for gas cylinders, commonly used for grilling or camping, most moving companies won't handle them due to their flammable properties. Therefore, you'll likely need to either arrange separate transportation or dispose of them responsibly.
What You Can't Move or Movers Will Not Move
Here's something you might not have considered: not all kitchen items are move-friendly. Many moving companies avoid perishable items, alcohol, and open food containers. As for your top-of-the-line kitchen appliances, some might necessitate professional disconnection, particularly those hooked up to a gas line. Moving isn't just about unplugging and leaving. You need to know what can be moved and what can't to avoid surprises.
One item that people often misunderstand is half-used cleaning products. It may be tempting to move them, but leaks can damage your belongings. If you need to bring them, tighten the lids with plastic wrap underneath, and store them upright in a leak-proof tote. Never mix different chemicals in the same container. Do not pack bleach and ammonia near each other. When combined, they release toxic fumes.
Not all kitchen items can go in the moving truck. Here’s a list of common items movers usually won’t take, and why.
| Item | Reason Not Allowed | Suggested Action |
|---|---|---|
| Gas cylinders (propane) | Flammable and hazardous | Use locally or dispose of at a certified center |
| Open food containers | Leak/spill risk and contamination | Consume, donate, or discard before moving |
| Cleaning supplies with chemicals | Hazardous material regulations | Seal in clearly labeled container or dispose responsibly |
Packing and Preparing Appliances
So, you find yourself scrutinizing your kitchen gadgets, wrestling with the dilemma: "Should they stay or should they go?" Let's clear the air. If those appliances are modern, high-end, or equipped with must-have features, they're worth taking along. However, if they're dated or you're heading to an already furnished space, it might be smarter to say goodbye. The American Moving and Storage Association states that hauling large appliances can significantly bump up your moving expenses. Therefore, balance their sentimental and functional value against the financial stakes.
Start by preparing your most-used kitchen gadgets for the move. Check the user manuals to learn how to take apart each item. You can usually find instructions online if you no longer have the manuals. Unplug and clean each appliance to avoid problems later. Use bubble wrap to cushion delicate or electronic parts.
Many homeowners are unsure whether to leave internal parts, such as blender pitchers or coffee pot inserts, in place. You should always remove these parts and wrap them separately. Leaving them in place raises the risk of breakage, even if the appliance seems secure. Use zip ties to keep cables neat. Store screws or knobs in zip-top bags, and tape the bags to the appliance so you don’t lose them.
If you're moving your fridge, start the defrosting process at least two days ahead of time. Use sturdy tape to secure all removable parts, and wrap the entire unit in a heavy-duty moving blanket for protection. A study by the National Association of Professional Organizers indicates that effective labeling can speed up the unpacking process by as much as 30%. So, clearly mark each box with its contents and the spot it's destined for in your new home's kitchen.
How to Pack Like a Pro
Fragile Items
You have a treasured collection of china and glassware, each piece tied to special memories and meaningful events. Moving them is risky, but seeing them in your new home is worth it. Wrap each item in bubble wrap and seal it with tape. Place the wrapped items in a box lined with crumpled packing paper at the bottom.
Pack glasses and mugs upright using cardboard dividers or glass sleeves sold at moving supply stores. Do not stack them on their sides. This puts extra pressure on the items and increases the risk of breakage. Fill any gaps between items with newspaper or kitchen cloths to keep them from shifting during the move. For extra protection, you can use dish packs. These are special boxes with dividers that keep each piece secure.
Many people aren’t sure whether to pack glasses facing up or down. The safest way is to pack them upright, especially when you use glass sleeves or dish pack boxes. Stacking glasses face down might save space, but it adds pressure that can crack thinner glass. Place crumpled paper or towels between each glass to absorb shock. Use snug dividers to keep them from shifting.
To avoid bubble wrap, place breakables between soft materials like dish towels, cloth napkins, or reusable grocery bags. Wrap each mug or glass in a sock, and stand them upright in a box padded with balled-up newspaper. You can also use compostable packing peanuts or molded pulp dividers. Both are biodegradable and sturdy.
Many people think regular medium boxes with padding are enough for fragile dishware. But dish pack boxes reduce breakage by up to 60%, according to industry tests. Dish packs include built-in dividers and thick double walls that protect against pressure from the sides and weight from stacking during transport. They cost more. Expect to pay about $5 to $7 each, compared to $2 to $3 for a standard box. But if you're packing fine china or expensive stemware, that extra cost is small compared to what it might cost to replace broken items.
Packing the Pantry
For your pantry essentials, the main objective is to distinguish between items that are perishable and those that aren't. With perishables, donate what you can't take with you and store the rest in coolers for the journey. Regarding non-perishables, select medium-sized boxes and be mindful not to overfill them. Arrange heavier staples like canned goods at the bottom of the box, placing lighter items above. Studies indicate that well-organized spaces can significantly reduce stress, so use this time to streamline your pantry, retaining only the items that truly meet your needs.
How to Pack and Move Different Types of Food
Not all food travels the same way. Here’s how to handle different types of kitchen food, from canned goods to frozen items, so nothing spoils, leaks, or gets left behind on moving day.
| Food Type | How to Pack | When to Pack or Use |
|---|---|---|
| Canned & Jarred Goods | Use small boxes, place heavy items on bottom, pad with paper to prevent shifting. | Pack 1–2 weeks before move. |
| Dry Pantry Staples (pasta, rice, flour) | Seal in plastic bags, then place in medium boxes; label as dry goods. | Pack 1 week before move. |
| Frozen Foods | Consume ahead of time; pack remainder in a cooler with dry ice only if moving short distance. | Use or donate 2–3 days before move. |
| Fresh Produce | Consume, compost, or donate. Avoid packing unless moving locally with climate control. | Consume 3–5 days before move. |
| Bottles & Liquids (oils, vinegar, sauces) | Tape lids shut, place upright in leak-proof plastic bins or bags. | Pack 3–5 days before move. |
| Snacks & Sealed Packaged Goods | Keep in original packaging, add to "Essentials Box" if needed right away. | Pack last or keep in Essentials Box. |
Packing Cookware
Your cookware isn’t just made of metal. It’s the equipment that fuels your creativity in the kitchen. To pack efficiently, stack smaller pots inside larger ones. Place dish towels or bubble wrap between them for cushioning. For important appliances like your mixer or coffee maker, check the user manual to take them apart and pack them safely. Setting up your kitchen first can lower the stress of moving. It also helps you feel more comfortable on your first morning in your new home.
Small Kitchen Appliances
Small kitchen appliances like blenders, toasters, and air fryers also need special care. Remove any loose parts and place them in labeled zip bags. Tape the bags to the appliance base. Wrap each appliance in a towel or cushioned cloth, then put it in a snug-fitting box. Fill empty spaces in the box with dish rags or paper to keep the appliance from moving. If the appliance has glass parts, like a coffee grinder or food processor, protect those parts first.
A helpful tip for packing awkward-shaped gadgets like immersion blenders or waffle makers is to use foam inserts and zip ties to stabilize any loose parts and prevent movement. Foam cut-outs made for tools or electronics can also work well to cushion kitchen appliances. This method helps reduce jostling and damage during transport, especially for appliances with detachable parts or sharp edges.
Devices such as digital meat thermometers, timers, and smart scales can corrode on the inside if batteries are left in place. The National Electronics Service Association recommends removing the batteries and taping them to the device in a labeled zip-top bag. This helps prevent leaks and makes it easier to reassemble the device after the move.
Utensils and Sharp Tools
Group similar utensils with rubber bands and wrap them in dish towels to keep them from clattering. Place them in a shallow, sturdy box labeled "Utensils, Drawer Ready." Use blade guards or sheaths for sharp tools or peelers if you have them. If not, use cardboard sleeves taped shut to protect against punctures. This keeps you safe while unpacking and helps prevent damage during the move.
Some people wonder if they can pack cutlery directly in kitchen drawers. While this might seem efficient, it can lead to scratches or injuries if the drawers open during the move. If you decide to leave items in the drawers, use dish towels for padding and wrap the whole unit with stretch wrap. Avoid packing tape, which can leave behind sticky residue. Wrapping utensils and placing them in a shallow box is still a safer and more flexible option, especially when packing a variety of box sizes.
Creating an 'Essentials Box'
You've navigated the complex yet rewarding challenge of moving your kitchen. Now, you're in your new home, encircled by many boxes, longing for a soothing coffee or maybe a simple family meal. This is the moment the 'Essentials Box' becomes invaluable. Pack this box last, but make it the first one you open. Inside, place your coffee maker, a trusty dish set, baby bottles if you have an infant, and a selection of non-perishable snacks.
Why is this box indispensable? Picture yourself sifting through a maze of boxes, hunting for that single item that could ease the chaos of your first night. The 'Essentials Box' goes beyond mere convenience; it safeguards your lifestyle and emotional well-being during a pivotal life change. In the midst of sweeping changes, this box acts as your stabilizing force, making your inaugural evening in your new home not just tolerable but genuinely comforting.
DIY vs. Professional Moving Company
Pros and Cons:
In your kitchen, surrounded by years of memories and essential items, you face a critical decision: Should you opt for a DIY move or hire the services of professional movers? Both choices come with their own set of advantages. A DIY approach provides a greater sense of control and is often more budget-friendly initially. You set the timetable and experience the gratification of handling your valued possessions yourself. However, it's also a labor-intensive task that can escalate into a daunting ordeal. In contrast, professional movers offer a seamless, efficient experience. They are trained to manage everything from your delicate heirloom dishes to your hefty, high-end kitchen appliances. But this ease and efficiency carry a price tag, both in terms of finances and ceding control.
Hidden Costs of DIY
The initial savings from a DIY move can be enticing, yet those figures can be misleading. It's essential to consider hidden costs like truck rentals, fuel, packing supplies, and possibly even short-term storage. Plus, don't underestimate the value of your own time. While DIY may seem cheaper at the outset, unexpected expenses can sneak up on you. For example, poor packing can result in damaged belongings, which add replacement costs to your final bill.
Ultimately, the best approach to relocating your kitchen depends on what matters most to you. If you're on a budget and willing to put in the time and effort, a DIY move could be the way to go. However, if you prioritize efficiency, skill, and ease of mind, then hiring professional movers is likely worth the extra cost. Regarding moving companies, look for those that offer specialized kitchen packing services, as they'll have the expertise to handle everything from your delicate glassware to your bulky appliances. The secret lies in aligning these options with your specific needs and limitations. Regardless of whether you opt for DIY or engage the pros, careful planning is the cornerstone of a seamless move.
Here’s a simple comparison to help you decide if you want to move your kitchen yourself or hire professional movers.
| Factor | DIY Move | Professional Movers |
|---|---|---|
| Cost | Lower upfront, but may incur hidden expenses | Higher cost, includes labor and insurance |
| Time & Effort | Labor-intensive, takes longer | Quick and efficient |
| Control | Full control over packing and timing | Less control, more convenience |
| Risk | Higher risk of damage or loss | Lower risk with trained handling |
Moving heavy kitchen appliances on your own may seem cheaper, but renting or buying appliance dollies and protective straps can cost between $60 and $150. You should also consider potential damage. Scratched floors or broken doors can cost more than the $300 to $500 required to hire appliance movers. Hiring professionals is usually worth the cost if your appliances are worth more than $1,000, or if your home has tight corners or stairs.
Moving Day Tips
The countdown is on, and your kitchen is almost ready for the move. Don’t forget those last-minute essentials, like the coffee maker you use every morning or the toaster for your bagel. Set aside a separate box for these items and label it “Day-of-Move Essentials.” A clearly labeled box for last-minute items helps reduce stress on moving day. This way, you won’t have to dig through a mountain of boxes to find your morning lifeline, like your coffee maker.
Loading the Truck
Here's the pivotal step: loading up the truck. With fragile dishes, heavy appliances, and a sea of boxes to account for, how can you pack seamlessly? Begin with large items such as your fridge and stove, positioning them toward the truck's rear. Then, stack boxes of non-essential and infrequently used items. Keep your "Day-of-Move Essentials" box for last, making it easily accessible upon arrival at your new home. A well-thought-out loading strategy can slash your unpacking time by up to 25%. So with each box you place, visualize your future kitchen setup. Packing isn’t just about filling space in a vehicle. It sets the stage for settling smoothly into your new home. When packing your kitchen, think about how things will be arranged in your new space. Pack items in the same order you plan to unpack them, from utensils to appliances.
Unpacking and Setting Up
You've made it, and the panorama of boxes in front of you is both overwhelming and thrilling. Your kitchen, the home's nucleus, is calling for its renaissance. What's the first move? Turn to your 'Essentials Box.' Open this one first to restore a slice of normality. Position your coffee maker in a convenient spot; you'll be grateful come morning. Setting up key items initially can cut your overall stress levels by as much as 30%. So, put your essentials front and center and let them shape your new kitchen's design.
Organizing the New Space
Now, focus on the cabinetry. These aren't merely storage compartments; they're pivotal to your kitchen's operation. A well-ordered kitchen can substantially decrease stress levels. So, take the time to sort your belongings. Stick to the color-coded labels you established while packing. Items marked with green stickers should be within easy reach, followed by those with yellow and red stickers. Organizing your kitchen items by frequency of use can be a game-changer; place everyday items in easily accessible spots and seasonal or special-occasion items higher up or in the back. For your cookware, think about incorporating pull-out shelves to make it more accessible. Also, don't underestimate the utility of wall-mounted utensil racks, which serve both a practical and aesthetic purpose.
Common Mistakes and How to Avoid Them
Let’s be honest. Packing and moving a kitchen brings challenges that can turn a smooth move into complete chaos. Imagine arriving at your new home, excited to unpack your favorite china, only to find it broken. Or maybe your essential coffee maker disappears in a sea of boxes. About one in five moving complaints is about lost or damaged items. These aren’t just lost items. They can ruin the excitement of starting fresh.
So, how can you avoid common moving problems? Start by not skimping on packing materials. Cutting corners here just isn’t worth the risk. Opt for double-walled boxes for delicate items and seal them tight with industrial-strength packing tape. For items that are irreplaceable, it's smarter to carry them with you instead of placing them on a moving truck. Next, compile a detailed inventory list. Write down what’s in each box and take photos of anything valuable. This isn’t just for peace of mind. It’s important to claim anything lost or damaged.
Even with good intentions, small mistakes can lead to costly problems. One common mistake is packing heavy items, like cast iron pans or canned goods, in large boxes. This raises the risk of injuries and broken boxes. Use smaller boxes instead to make the weight easier to handle.
People often forget to defrost and drain appliances like the fridge or dishwasher, which can cause water damage and mold.
Avoid wrapping stainable items, like ceramic mugs with porous finishes, in newspaper. The ink can rub off and be hard to clean. Use unprinted packing paper or clean dishcloths instead.
Skipping box labels might save time at first, but it slows down unpacking and makes it harder to file a claim if something breaks. Taking a quick photo of each box before sealing it can save you hours of frustration later.
Frequently Asked Questions
Can I pack and move my gas stove?
Yes, but this isn’t something you should do on your own. A gas stove needs to be professionally disconnected to stay safe. The U.S. Department of Transportation also has strict rules about moving hazardous materials. Talk to your moving company to find out what’s involved and how much it will cost.
How should I pack kitchen knives safely?
Wrap each knife in bubble wrap and secure it with tape. Put the wrapped knives in a strong box and fill any open spaces with crumpled paper to prevent shifting. Label the box clearly with “Sharp Objects – Knives” so everyone handles it with care.
How long should I set aside for packing my kitchen?
Start packing your kitchen at least three weeks before your move. Begin with delicate items like china and glassware. Save everyday essentials for last.
What are some eco-friendly packing options?
Use towels or clothes instead of bubble wrap to cushion fragile items. Grocery stores often give away sturdy boxes that can be reused. According to an EPA study, using household items this way can help reduce your carbon footprint.
What insurance options should I consider for kitchen items?
Choose Full Value Protection if you're moving valuable items like heirloom china or high-end appliances. This type of insurance pays the current market value if anything is damaged.
Find a Moving Company in Your State

About the Author:
Margarita Hakobyan is the founder and CEO of MoversCorp.com. She has published more than 300 articles about moving, storage, and home organizing, making her a moving specialist since she began writing about the moving industry in 2005.
![]()
![]()
![]()
Copyright © 2008-2026 Local Movers Corp All rights reserved 1-888-755-2212